The guide shows how to create a Facebook Live stream using RadioBOSS. The stream will consist of a static image (e.g. radio station logo) and audio from what is playing in RadioBOSS.
Install FFMpeg
1. Download FFMpeg from https://www.ffmpeg.org (you will need Windows build) or use the file hosted on our server: https://dl.djsoft.net/ffmpeg.sfx.exe
2. Unpack FFMpeg archive. In the example we'll use C:\ffmpeg location.
Get Facebook Live streaming credentials
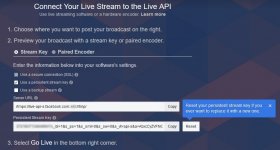
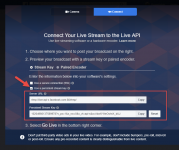
1. Visit https://www.facebook.com/live/create and click the Create live stream option.
2. It is recommended to enable the "Use a persistent stream key" option to prevent stream key from changing on each broadcast.
c. The Server URL and Persistent Stream Key will be needed for the next step
Create custom encoder in RadioBOSS
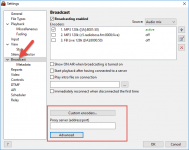
1. Open Settings and navigate to Broadcasting. Click the Advanced button and then click the Custom encoders button.
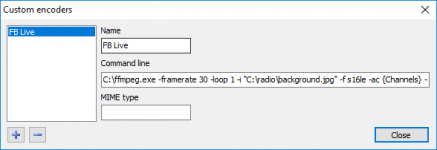
2. In the custom encoders window press the + button, name the encoder ("FB Live" in the example) and enter the following command:
Change the path_to_image part to actual image location, e.g. C:\radio\background.jpg
Change the stream part to Server URL and Persistent Stream Key, following each other. For instance,
Server URL is rtmp://live-api-s.facebook.com:80/rtmp/
Persistent Stream Key is 10204966136309946?ds=1&s_sw=0&s_vt=api-s&a=AbwYXNiE0zQsjgJY
The stream would be
The example of how the final command would look like:
Start streaming
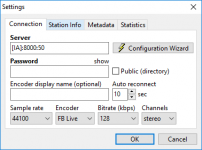
1. Add new encoder in RadioBOSS. Enter [IA]:8000:50 to the Server field.
2. At the bottom, select the "FB Live" encoder. Make sure the rest of the settings are at their defaults: sample rate is 44100, channels - stereo, bitrate - 128 kbps. Click OK.
3. Start music playback in RadioBOSS.
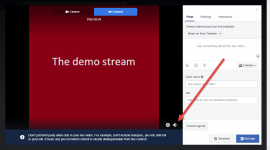
On successful connection, the report in the bottom-left corner will show the following message: Connected to server! (output N). and the stream will be available on the Facebook live page.
The Facebook page should now show the image and play audio (it can be muted by default on the facebook page).
Install FFMpeg
1. Download FFMpeg from https://www.ffmpeg.org (you will need Windows build) or use the file hosted on our server: https://dl.djsoft.net/ffmpeg.sfx.exe
2. Unpack FFMpeg archive. In the example we'll use C:\ffmpeg location.
Get Facebook Live streaming credentials
1. Visit https://www.facebook.com/live/create and click the Create live stream option.
2. It is recommended to enable the "Use a persistent stream key" option to prevent stream key from changing on each broadcast.
c. The Server URL and Persistent Stream Key will be needed for the next step
Create custom encoder in RadioBOSS
1. Open Settings and navigate to Broadcasting. Click the Advanced button and then click the Custom encoders button.
2. In the custom encoders window press the + button, name the encoder ("FB Live" in the example) and enter the following command:
C:\ffmpeg.exe -r 30 -loop 1 -i "path_to_image" -f s16le -ac {Channels} -ar {SampleRate} -i - -c:a aac -b:a 128k -c:v h264 -b:v 768k -g 60 -f flv "stream"
Change the path_to_image part to actual image location, e.g. C:\radio\background.jpg
Change the stream part to Server URL and Persistent Stream Key, following each other. For instance,
Server URL is rtmp://live-api-s.facebook.com:80/rtmp/
Persistent Stream Key is 10204966136309946?ds=1&s_sw=0&s_vt=api-s&a=AbwYXNiE0zQsjgJY
The stream would be
Code:
rtmp://live-api-s.facebook.com:80/rtmp/10204966136309946?ds=1&s_sw=0&s_vt=api-s&a=AbwYXNiE0zQsjgJYThe example of how the final command would look like:
C:\ffmpeg.exe -r 30 -loop 1 -i "C:\radio\background.jpg" -f s16le -ac {Channels} -ar {SampleRate} -i - -c:a aac -b:a 128k -c:v h264 -b:v 768k -g 60 -f flv "rtmp://live-api-s.facebook.com:80/rtmp/10204966136309946?ds=1&s_sw=0&s_vt=api-s&a=AbwYXNiE0zQsjgJY"
Start streaming
1. Add new encoder in RadioBOSS. Enter [IA]:8000:50 to the Server field.
2. At the bottom, select the "FB Live" encoder. Make sure the rest of the settings are at their defaults: sample rate is 44100, channels - stereo, bitrate - 128 kbps. Click OK.
3. Start music playback in RadioBOSS.
On successful connection, the report in the bottom-left corner will show the following message: Connected to server! (output N). and the stream will be available on the Facebook live page.
The Facebook page should now show the image and play audio (it can be muted by default on the facebook page).
Attachments
Last edited: